|
|
Zagi 400 Electric
Zagi 400 Electric Building Tips
Unlike the Zagi EPP or the Boomerang, the Zagi 400 Electric Wing has only a leading edge made of EPP, glued to white styrofoam wings. Its a lot like the foam you see on those old white coolers. However, it trades some durability for a lot of weight savings, which is required for a speed 400 electric plane. This is my first electric, but I took to heart a lot of the other tips I read on the RCSE and Zagi mailing lists. Some of them are included below.
This is a GREAT plane. Its a blast to fly low to the ground and do maneuvers you would never EVER try with a standard electric balsa or fiberglass ship. It saves a no-lift day at the slope, or when you just don't feel like going to the slope. I heard some folks combat them, but I don't want mine destroyed before I have sufficient time to enjoy it.
|
|
|
General Building Tips
1. First, this plane does not have a spar system at all. The lack of a spar and high-G maneuvers have lead to flutter in the wings. So, a lot of folks have been sinking into the white foam wings a carbon fiber rod along the span. Some even do this after they have flown theirs for a long time to regain some stiffness.
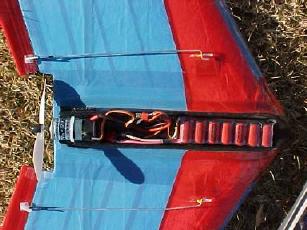
2. I decided to go with carbon fiber strips epoxied along the span of the wings top and bottom. This, combined with the tape schedule for strapping tape resulted in an exceptionally stiff wing. You can see the CF on the top through the blue tape in the pictures.
3. Although the instructions say to tape the entire wing and THEN install the radio gear. This ended up requiring me to cut through the strapping tape (not good for strength) and just looked horrible. I ended up taking it all off, installing the gear, running the antenna wire, and then re-taping the covering. It looked MUCH better.
|
Radio Gear Installation
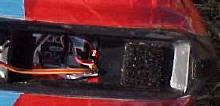
1. I used the smallest gear I could afford on this puppy. I installed a Hitec 555 micro rx under the battery bay. I removed the case only because I didn't want to dig any more foam out of the nose area to keep the battery from pressing on the rx plugs. Even though the instructions say to mount a standard receiver behind the battery bay, putting it up front helps reduce parasitic nose lead later. The rx is merely pressed in lightly to the hole, so I could lift it out if I needed to do any quick repairs/checks.
2. For the servos, I used Diamond micro servos. They are equivalent to the Hitec HS-81's a lot of people suggest using. I mounted them flush and they are just held in place by the snug fit of the cutout and the strapping tape.
3. Control throws are important as well. I didn't really listen to the instructions on this. I reduced the elevator throws by 40% under my dual rate setting. As for the aileron throws, they are at full blast. This sucker can really maneuver and perform substantial aerobatics when given enough throws.
4. As for the battery. I use 7 cell 500ARs. The kit came with 500AEs, which can only be charged safely at 1amp, and take forever. The 500ARs (which are getting harder to find) can be charged at 2amps. They are much better in my opinion. Get about three packs. Charge them all before going to the field and you can fly almost continuously.
|
|
|