
|
|
Boomerang EPP Combat Wing
Like the Zagi EPP, the Boomerang is made entirely of EPP foam, so its exceptionally resiliant and resistant to SEVERE abuse. However, unlike the Zagi EPP, the Boomerang has a single carbon fiber spar (like an arrow shaft). The wing halves are even shipped with a hole drilled down the span of each half to accept the CF spar.
This results in a VERY light combat wing. Evidently its the champion wing out in California. I use this wing more than my Zagi EPP tank because it can fly in lighter lift and has a faster airfoil. Its very tough too. I attempted to do a loop from behind the slope intending to dive down the front of the slope past myself, but misgauged where the edge of the slope was and drilled it straight down into the ground from a 100 foot power dive. It just bounced wildly with absolutely no damage. Hardly even dinged the EPP! No stripped gears either, which surprised me (the servos are old Futaba S-133s).
I didn't make too many modifications to the building of this wing, but what I did do I will describe. The instructions are pretty straight forward and it was my second wing, so no real surprises.
|
|
|
General Construction Modifications
1. First, the instructions say to use goop or a similar glue to join the halves. Instead, I went the Zagi EPP route and slathered 3M 77 spray adhesive on the roots of each wing panel and let them set up. When tacky I merely pressed them together. You have to do a few other things (i.e. install one end of the CF spar first) before you join the halves.
2. Second, I wanted to really preserve the airfoil as much as possible. Instead of cutting battery bays from the top or bottom, I routed out a matching hole in both wing roots before joining them. I made it so the battery fit in half way into each wing. This maintained the airfoil significantly. Unfortunately, if the battery ever goes, I will have to cut a hole in the top or bottom of the wing to get to it.
3. I installed the switch on top, but didn't recess it far enough. It should be set into the foam flush so that an inadvertant blow by your prey doesn't actually move the switch into the OFF position! Anyway, the switch is glue gunned in and I put a piece of electrical tape across is when I fly just to be safe.
|
|
|
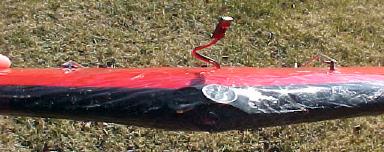
Top View of the Leading Edge
You can see here how the airfoil is almost undisturbed from installation of the gear. This is by far the most efficient job I have done. You can see the pennies I tapped on for extra nose weight during my last flight. Still trimming and adjusting!
You can also see the charge lead hanging out of its pocket. I of course stuff that lead away before I fly. Imagine if it got stuck on something....RRRRIiiip!
|
 |
Nose Profile View of the Boomer
You can tell I am pretty proud of my job on the radio gear installation, right?
|
|

